Create a personalized log of your hikes in the Bruce Trail App.
This feature was introduced Oct. 30, 2026 in version 2.8 for iOS, and version 1.10.88 for Android. It may take up to a week for these versions to be fully available for all users across the App Store and Play Store.

In this section we will cover how to…

Add to your log:

  • Add tracked hikes or saved routes

Organize your log:

  • Tag hikes with helpful categories
  • Sort your log entries.

View your log:

  • See all your hikes on the same map
  • Search for hikes
  • See total distance covered

Share your log: Coming in a future build

Working on an End-to-End? Hike logs can take any format. You do not need to use the Bruce Trail App to log your hikes for End-to-End recognition or badges. Learn more about End-to-End recognition >

Hike Log How Tos

Add to your Hike Log

Hikes can be added to your log:

  1. When you create them (that is, when you save a tracked hike or route).
    OR
  2. From your previously saved Tracks or Routes via the Hike Log page. (Ideal for adding Tracks or Routes in bulk)
    OR
  3. From your previously saved Tracks or Routes via the “Saved Pins, Routes & Hikes”. (Best if you’re only adding single Tracks or Routes).

See the following How Tos for instructions on each method.

Hikes can be added to your log when you create them (that is, when you save a Tracked Hike or Route).

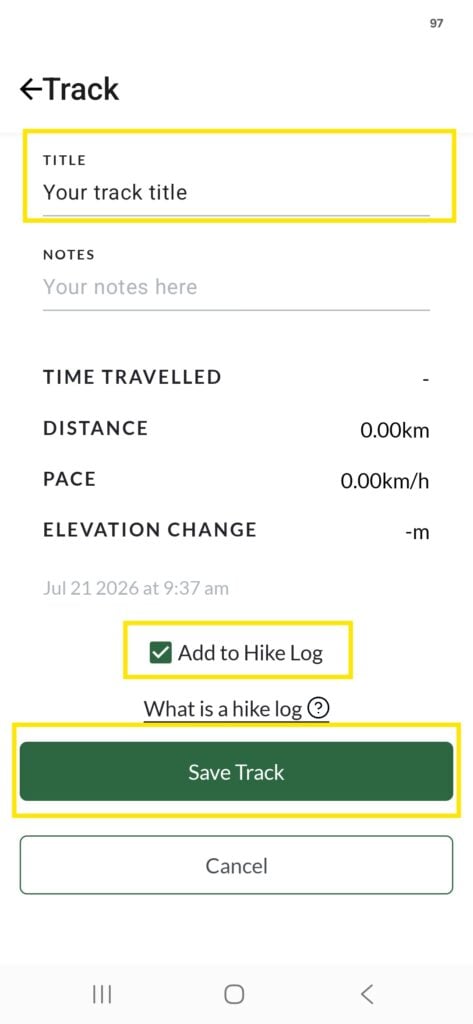
When you save a Tracked Hike:
• When you “Stop” tracking, then tap “Finish” you’ll be brought to a screen to save your Tracked Hike.
• Give your Track a Title (required) and Notes (optional).
• Check the “Add to Hike Log” checkbox.
• Tap “Save Track”.
When you save a Route:
• When you place the last pin of your Route, and tap “End Here”, you’ll be brought to a screen to save your Route.
• Give your Route a Title (required) and Notes (optional).
• Check the “Add to Hike Log” checkbox.
• Tap “Save Route”.
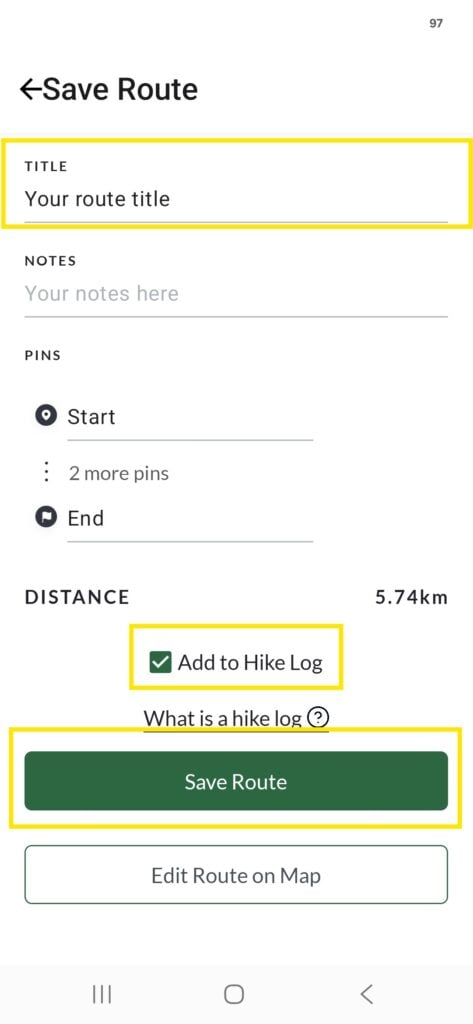
You don’t have to add a Track or Route to your log immediately.

If you simply save it, you’ll be able to retrieve it later and add it to your Hike Log (see next How Tos).

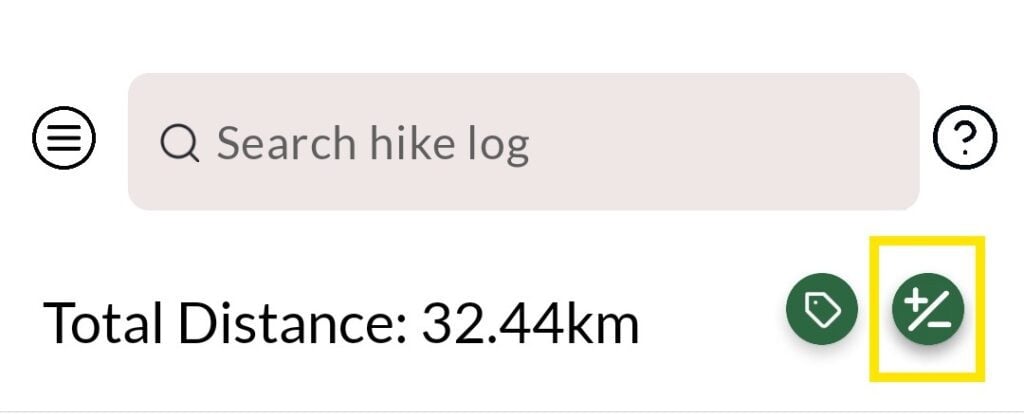
You can add a saved Track or Route directly from the Hike Log page using the green “+/-” tool.

  1. From the main menu, select “Hike Log”.
  2. Tap the green “+/-” icon at the upper right corner of the screen.
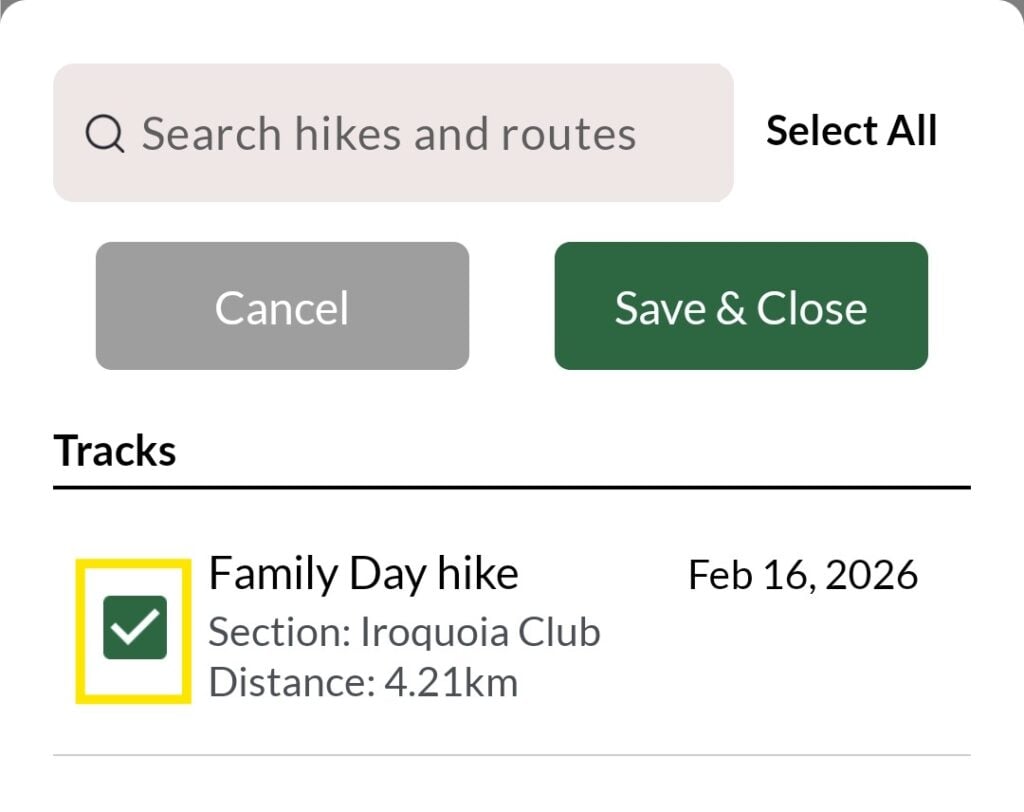
  1. All your saved Tracks and Routes will appear. The Tracks are first, followed by Routes. You may need to scroll down to the Routes if you have a lot of Tracks.
  2. Select any hikes you wish to add by tapping on the associated checkbox.
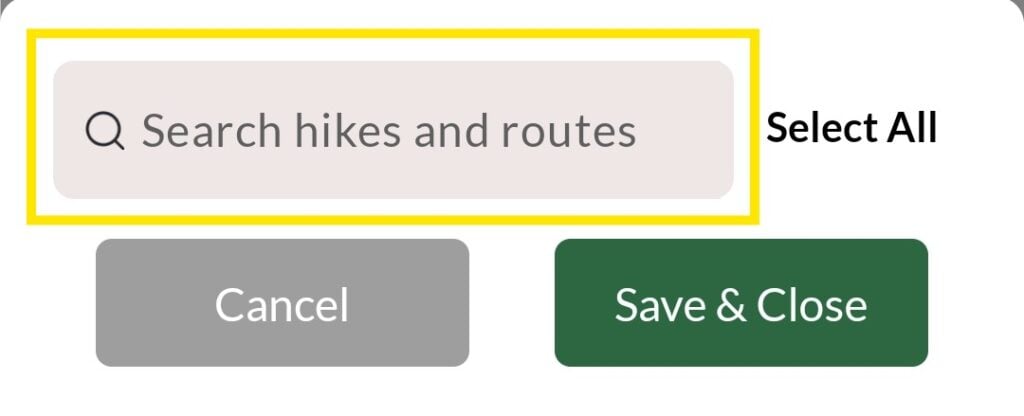
  1. (Optional) Use the search bar at the top of the screen to find particular Tracks or Routes. You can search by title or section.
  1. Tap “Save & Close” (the green bar near the top of the screen).
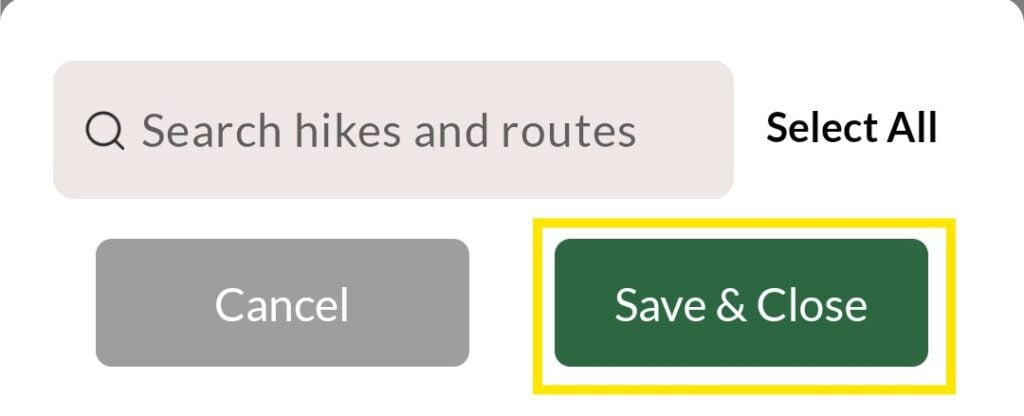
Your selected Tracks and Routes will display on the Hike Log.

This is the recommended method for adding multiple Tracks or Routes at a time to your Hike Log.

You can add a Track or Route you have saved from the “Saved Pins, Routes & Hikes” area.

  1. From the main menu, select “Saved Pins, Routes & Hikes”.
  2. Select either “Saved Routes” or “Tracked Hikes”.
  3. Tap on any Saved Route or Tracked Hike to open its details.
  4. Select “Add to Hike Log” at the bottom of the screen.

Your selected Tracks and Routes will display on the Hike Log.

This method is best for adding individual Tracks or Routes to your Hike Log.

If you wish to add multiple hikes, it is best to do so via the Hike Log directly using the green “+/-” tool (see previous How To).

Removing hikes via the Hike Log – Method 1 (recommended for individual removals)

  1. From the main menu, select “Hike Log”.
  2. Find the hike you wish to remove. Tap the three dots at the far right end of the hike listing.
  3. Select “Remove from Log”.

Removing hikes via the Hike Log – Method 2 (recommended for multiple removals)

  1. From the main menu, select “Hike Log”.
  2. Tap the green “+/-” icon at the upper right corner of the screen.
  3. All your saved Tracks and Routes will appear. The Tracks are first, followed by Routes. You may need to scroll down to the Routes if you have a lot of Tracks.
  4. De-select any hikes you wish to remove, by tapping on the associated checkbox.
  5. (Optional) Use the search bar at the top of the screen to find particular Tracks or Routes. You can search by title or section.
  6. Tap “Save & Close” (the green bar near the top of the screen)

Removing hikes via the “Saved Pins, Routes & Hikes” area:

  1. From the main menu, select “Saved Pins, Routes & Hikes”.
  2. Select either “Saved Routes” or “Tracked Hikes”.
  3. Tap on the Saved Route or Tracked Hike you wish to remove to open its details.
  4. Select “Remove from Hike Log” at the bottom of the screen.

! Removing hikes from your Hike Log does NOT delete them from the app. They will still be saved in your “Saved Pins, Routes & Hikes” area and can be re-added at any time.

! Tags do NOT remain saved on a hike if a hike is removed from the Hike Log. But a tag may be easily re-added manually if a hike is re-added to the Hike Log. (See How Tos on Tags)

You can record your hikes by either tracking them as they happen (a Track) or by creating a manual record (a Route).

Tracked Hike:
• A live record of your hike created in real time as you are hiking.
• Created with the Track tool.
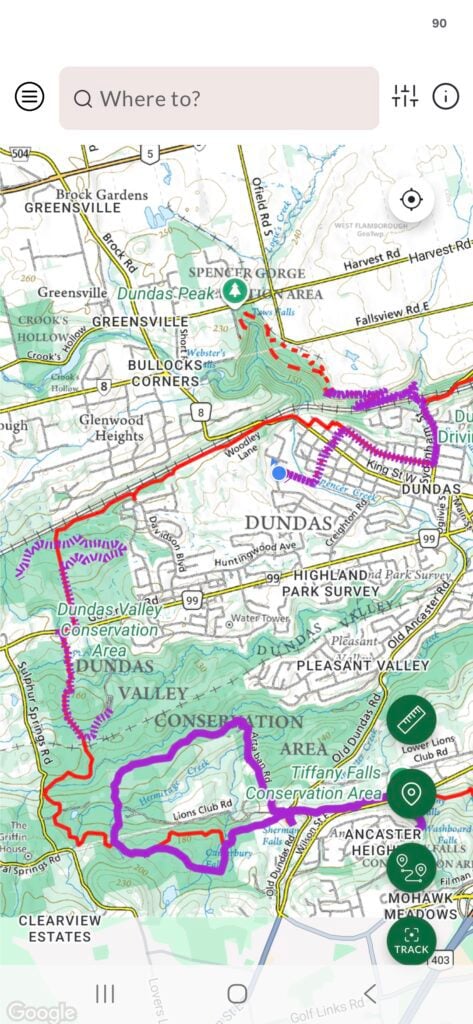
• Shows as a dashed purple line on the map.

Route:
• A manual record of a hike, created by tapping along the trail to drop pins.
• Created with the Route (zig-zag) tool.
• Shows as a solid purple line on the map.

TIP: Routes can be useful records when you did not track your hike or if the tracking was interrupted or incomplete.

In the Hike Log:

• Both Tracked Hikes and Saved Routes can be added to your Hike Log.
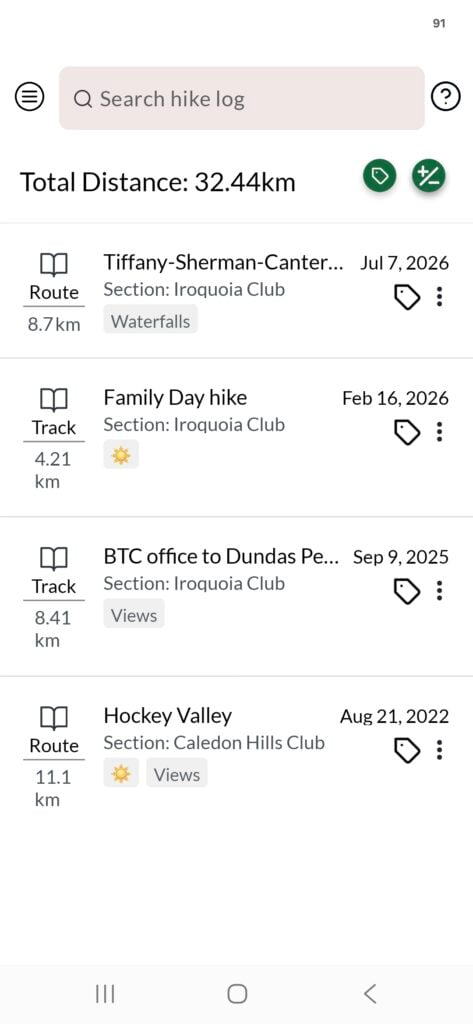
• Look for the “Track” or “Route” label under the logbook icon on the left side of each hike in your log to see the difference.
• When the Hike Log is displayed on the Explore map, Tracks are dashed purple lines and Routes are solid purple.

Organize your Hike Log

By default, your hikes are listed in the Hike Log by date with the most recent at the top.

Use the long press–drag–drop method to reorder.

  1. Long press on a hike in your log.
  2. Drag to reorder.
  3. Release your finger to drop the hike in the spot you want it.

Tags are helpful categories or labels you can give to hikes in your Hike Log (for example: winter, waterfall, side trail, badge hike, etc.)

Tags can be given to one hike or multiple hikes.

One hike can have multiple tags.

Tags can be used to search for a particular group of hikes.

Tags can even be emojis!

An “All” Tag is automatically available in the tag and search functions so that you can return to all hikes in your log.

NOTE: Tags do NOT remain saved on a hike if a hike is removed from the Hike Log. But a tag may be easily re-added manually if a hike is re-added to the Hike Log.

TIP: You DON’T need to add a Tag for the Bruce Trail Section of a hike (e.g. Iroquoia). That information is already automatically saved and displayed on hikes and can be searched.

  1. Find a hike in your Hike Log.
  2. Tap on the Tag icon to the right of the hike title, under the date.
  3. Tap any of the existing tags to add it to your hike.
    OR
    Tap “Add New Tag” to create a new one. Give it a name and tap “Add”
  4. Tap “Save & Close”.

Your hike will be displayed in the Hike Log with its tags showing under the title.

From the Hike Log screen, select the green tag icon at the top right corner of the screen.

If your Tag already exists:

  1. Tap the name of the existing Tag in the “Tags:” list near the top of the screen.
    Checkboxes will appear to the right of all hikes.
  2. Select any hikes you want to add the tag to by tapping the checkbox to the right of the hike title.
  3. Tap “Save & Close” (the green bar near the top of the screen).

If you want to make a new Tag and add to multiple hikes:

  1. Tap “Add New Tag” under the “Tags:” list near the top of the screen
  2. Type a name for your Tag in the small box that appears beside “Add New Tag”
  3. Tap “Add”
    Your new tag will appear in the list of “Tags:” and be green.
    Checkboxes will appear to the right of all hikes.
  4. Select any hikes you want to add the tag to by tapping the checkbox to the right of the hike title.
  5. Tap “Save & Close” (the green bar near the top of the screen).

TIP: An “All” Tag is automatically included in the list of Tags so that you can return to seeing a list of all your hikes in the Hike Log.

Remove a Tag from a single hike:

  1. Find a hike in your Hike Log.
  2. Tap on the Tag icon to the right of the hike title, under the date.
  3. Tap the “x” next to the Tag you wish to remove.
  4. Tap “Save & Close”.

Remove a Tag from multiple hikes:

  1. From the Hike Log screen, select the green tag icon at the upper right corner of the screen.
  2. Tap on the name of the Tag you wish to remove from the “Tags:” list near the top of the screen.
    Checkboxes will appear to the right of all hikes.
  3. De-select any hikes you want to remove the Tag from by tapping the checkbox to the right of the hike title.
  4. Tap “Save & Close”.

Remove a Tag from all hikes:

  1. From the Hike Log screen, select the green tag icon at the upper right corner of the screen.
  2. Tap on the pencil-box icon beside the name of any Tag you want to remove (try not to tap the name of the Tag itself).
  3. Instead of renaming the Tag, tap on the “Delete” option (next to “Done”).
  4. Tap “Save & Close”.

NOTE: If a hike is removed from the Hike Log, the Tag is automatically removed from that hike. But a Tag may be easily re-added manually if a hike is re-added to the Hike Log.

  1. From the Hike Log screen, select the green tag icon at the upper right corner of the screen.
  2. Tap on the pencil-box icon beside the name of any Tag you want to rename (try not to tap the name of the Tag itself).
  3. Tap in the box that is created with a flashing cursor next to the Tag name. Rename your Tag.
  4. Tap “Done”
  5. Tap “Save & Close”.

NOTE: If the Tag turns green but no editing options come up, try again to tap the pencil-box icon and not the name of the Tag.

View your Hike Log

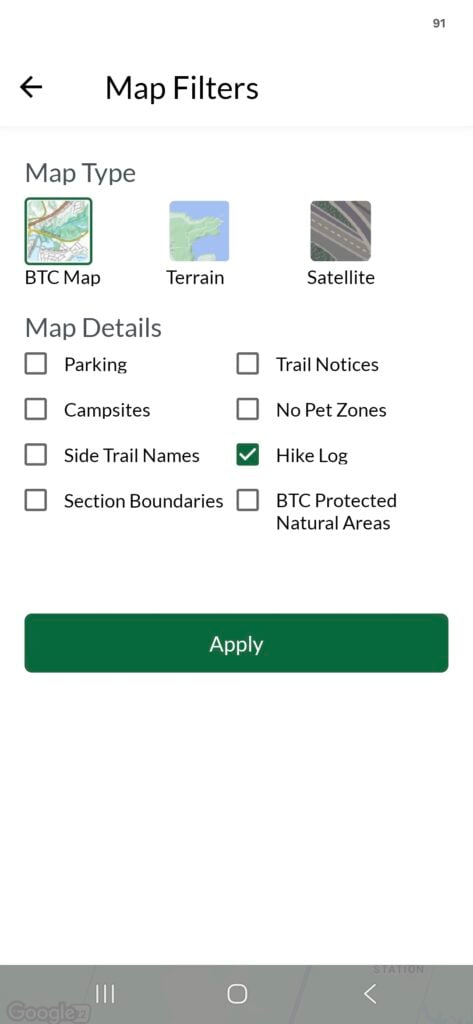
Make sure that “Hike Log” is selected in the Map Filters of the Explore screen.

  1. From the main menu, head to “Explore”
  2. Tap on the filter icon at the top right of the screen.
  3. Under “Map Details” select “Hike Log”
  4. Tap “Apply”

All the hikes in your Hike Log will be displayed in purple.

Tracked Hikes are displayed with a dashed purple line. Routes are displayed with a solid purple line. (See How To: “Understanding the difference between Tracks and Routes” for more details.)

You’ll need to add hikes to your Hike Log to have them displayed. Saved Routes and Tracked Hikes are NOT automatically added to your Hike Log.

TIP: De-select other Map Details (like parking or trail notices) in order to see your Hike Log hikes better.

From the Hike Log, you can choose to view any individual hike.

  1. In the Hike Log, find the hike you wish to view.
  2. Tap the three dots at the far right end of the hike listing.
  3. Select “View Route”/”View Track”
  4. Tap the green “View on Map” button.

This will open the Explore screen with your chosen hike in the centre, displayed in purple.

NOTE: Selecting “Remove from View” does not remove your hike from the Hike Log. It simply removes it from being displayed at that moment.

As you add hikes to your Hike Log, the Total Distance is automatically calculated and displayed at the top of the Hike Log screen.

  1. From the main menu, select “Hike Log”.
  2. Look for “Total Distance” just under the search bar at the top of the screen

NOTE:
If you have no hikes in your Hike Log, no Total Distance will appear.
Only hikes added to your Hike Log will be included in the Total Distance calculation.

  1. Tap on the green +/- icon at the top right corner of the Hike Log.
  2. Use the search bar at the top (which says “Search tracks and routes”) to find particular Tracks or Routes you wish to add to your Log.

You can search by:
• Track or Route title
• Bruce Trail section (e.g. Iroquoia)

Use the search bar at the top of the Hike Log (which says “Search hike log”) to find particular hikes within your log.

You can search by:
• Track or Route title
• Bruce Trail section (e.g. Iroquoia)
• Tag

Search with Tags

  1. Tap in the search bar. Any existing Tags will be listed beneath the search bar.
  2. Tap on a Tag name to reveal all hikes that have that Tag.

Remove search results

  1. To remove the results, tap on the “x” on the right end of the search bar.

Please Consider Making a Donation

$
One-Time Gift